
For years I drove from Phoenix to Tucson and back, gazing at this large mountain peak jutting out of the ground far higher than those around it, so distinct in shape, just taunting me to climb it.
I finally did my research and learned of the Picacho Peak hike- a difficult hike with sheer drop offs that requires hikers to hold onto cables as they pull themselves up and to keep from falling off the sides.
Yeah, I was sold.
It immediately went onto my bucket-list and now I’ve finally conquered it.
If you are anything like me and are looking for the next challenging hike to conquer, Picacho Peak just may be it.
In this trail guide I cover all the details about the Picacho Peak hike from the best time, seasons, safety and more. Let’s begin this awesome adventure!
Hey there! Just so you know the below links contain affiliate links, which means I may receive commissions if you choose to purchase through my links (at no extra cost to you). You can visit my disclosure for more info.
Picacho Peak Hike Stats
- Distance | 3.08 miles RT
- Difficulty | Difficult
- Elevation Gain | 1,667 feet
- Location | Picacho Peak State Park, Eloy, AZ
- Dogs Allowed | Yes, but not past the cables section. No dogs at all is recommended.
- Trailhead | Hunter Trail
- Fees | $7 per vehicle
- Access | 2WD
Below is a map of the route to Picacho Peak.

The hike to Picacho Peak is rated difficult with steep drop-offs. If you are not comfortable scrambling with cables, are afraid of heights, or have bad knees, then you may not want to hike all the way to the peak. You have the option of stopping at the saddle and turning around, just before the steep cable sections begin.
Whether you hike the full Hunter Trail or cut it short, I promise you this one is worth it, especially during spring bloom!

Getting To Picacho Peak
The Picacho Peak hike begins within the Picacho Peak State Park in Eloy, Arizona. The park is located just off the I-10 between Phoenix and Tucson. The entry fee is $7 per vehicle, but if you have a valid Military ID you get 50% off.
They do have restroom facilities and a campground! Visit their website to learn more.
Travel Times
From Phoenix- 70 minutes
From Tucson- 36 minutes
Preparation saves lives. Know where you are going ahead of time and always have a way to keep yourself on trail. One way to do this is with a GPS system or app like Gaia GPS.
You can download my Picacho Peak hike and gain access to my library of all tracked hikes. Once downloaded, you can load it into your own trusty device for ease of mind!
You have the option of 2 different hiking trails to reach Picacho Peak. If you ask me you can’t go wrong with either. They both have their pro’s and con’s so read below to decide for yourself!

YELLOW = SUNSET VISTA TRAIL
BLUE = HUNTER TRAIL
Sunset Vista Trail
The Sunset Vista Trail begins from the end of the State Park and is longer in length at 5.5 miles round trip. It is more of a moderate and scenic trail that winds through the back portion of the park, on the opposite side of the Hunter Trail.
Hunter Trail
Probably the most popular way to reach Picacho Peak is via the Hunter Trail. This one begins near the front of the park, on the other side of the mountain as the Sunset Vista Trail. Hunter Trail is more difficult since it is shorter in length and begins climbing elevation right away. Think of it as the shorter and more direct route to take.
Note:
Both trails end up intersecting with one another and become one trail for the remainder of the climb up to the peak. There is NO escaping the cables for they meet up near the difficult cable sections.
I opted to take the Hunter Trail because I love a more challenging hike, so this post covers the Picacho Peak Hike via. Hunter Trail.
Once you make it through the park entrance you’ll take the first left turn, following signs for Hunter and Calloway Trails. This road is a medium sized loop with some parking spots for both trailheads. You’ll want to park in this area and find the Hunter Trailhead!
When To Hike Picacho Peak
The best months to hike around Phoenix are November-March, sometimes April depending on the weather. I highly suggest tackling your Picacho Peak hike during these months since it is cooler. March is also typically wildflower bloom season! The base of Picacho Peak brightens with yellow wildflowers during a good bloom. Be prepared for extra long lines to get into the park on the weekends during bloom!
Also, pay attention to the daily high temperature and plan around it because this hike is completely exposed. When you pair that with steep climbs it quickly becomes difficult and can dehydrate you quickly. Avoid hiking midday when the sun is at its peak.
With that being said, I highly suggest beginning your hike right at sunrise to beat the heat and crowds, or time it just right as the morning crowd is finishing, and with enough time for you to finish before sunset.
Important:
The trails within Picacho Peak State Park are only open from sunrise to sunset. You must be off the trails by the time the sun has set.

The Picacho Peak Hike
The Hunter Trail is well marked and easy to spot. It shares parking and a main trailhead with the Calloway Trail. You’ll just want to be sure to keep right and hike straight towards the mountain range.
In the beginning the trail is well groomed with a rocky, dirt path and wooden steps at parts. It gets straight to business by making you climb elevation right away. The gain is gradual at first, but as you near the base of the mountain it does get steeper.
Not long and you’ll find yourself at the first cable section. This small section is very easy compared to what is to come. I actually didn’t even need to use them at this point but they are available if you feel the need!

This cable section is a very good determiner if you should continue for the full Picacho Peak hike or not. If you find this part difficult then I suggest you only hike to the saddle and don’t continue to the steep cable sections. Keep reading and I’ll let you know at what point I am referring to!
If you find this part easy, however, I have full confidence you’ll be able to make it to the top!
After the first cables the Hunter Trail turns into a series of small switchbacks and remains steep all the way until you reach the saddle.

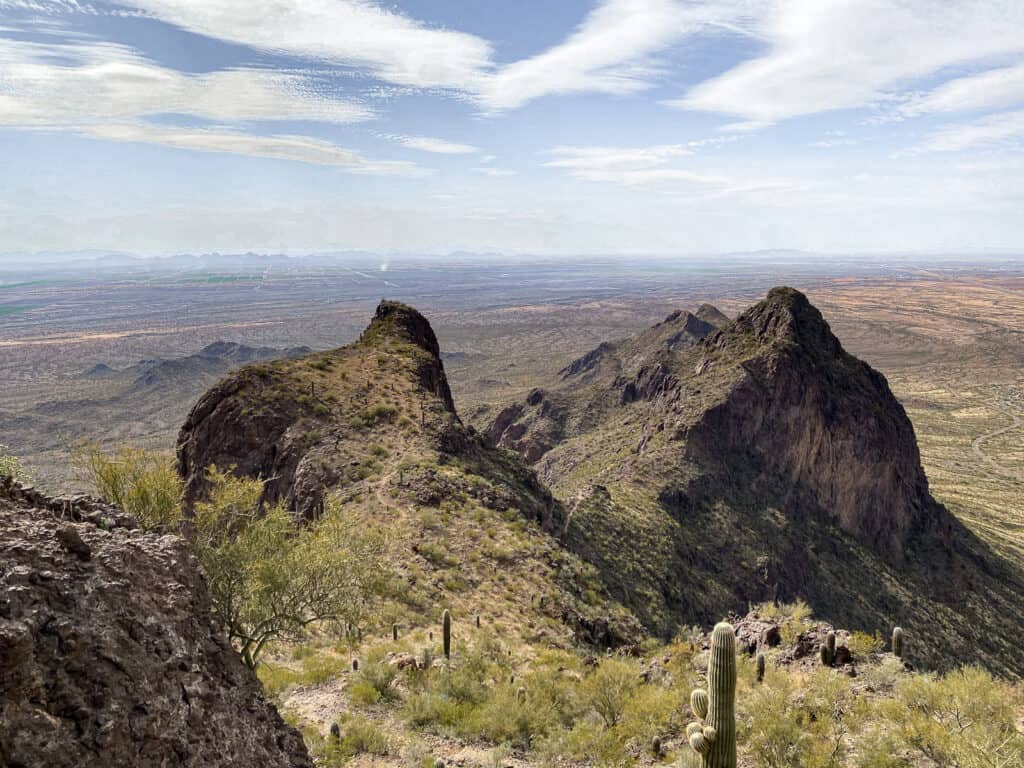
Once you can see the saddle in the distance it will feel a bit relieving. The switchbacks end and you’re rewarded with what I consider one of the best views along the Hunter Trail!
Between the greenery, blue skies, and pointy mountain peak in the distance I almost forgot we were in Arizona. The peak (pictured below) is not Picacho Peak, for Picacho is above and behind us in the photo.
The saddle I keep referring to sits between these two peaks, just ahead of where I am hiking in the photo below. This is a great place to stop for a break, eat some snacks, and drink some water. Beyond this point it becomes even more difficult, and if you think it may be too difficult for you, this is a good point to turn around to head back.

Continuing along the Picacho Peak hike from the saddle, you’ll immediately descend a steep and slick rock section using the cables. We decided to put our gloves on to protect our hands. The cables were in excellent shape, however they were slick. Choosing a glove with grips on them will help you keep hold!
It seems counterproductive that you have to go down in order to go up, I know. And coming back up this part kicked our butts! But this is the way the trail goes…and where the fun really begins.


Up next is arguably the “sketchiest” and most thrilling part of the Picacho Peak hike because you have to cross a very narrow section on the very edge of the mountain, with only cables on your right side.
If you aren’t sure of heights yet, this may help you determine.
If you crave adrenaline and adventure, well this part is really cool.

Beyond the super sketchy part the trail levels out a bit and provides beautiful views.
Once you round the corner you’ll hike up some more elevation but nothing too crazy until you reach the steep climb pictured below.
This section was a little tricky because it was very steep but also very narrow and almost like trying to walk in a crack. I used a lot of upper body strength here, keeping myself steady between the cables and pulling myself up.


The last difficult part of the Picacho Peak hike is pictured below. It is another portion on the very edge of the mountain with only cables on your side, but a much less steep drop off here.
Once beyond this portion of cables, the top of Picacho Peak is a little further. I thought this point was almost it, but it was a tease. You do have to climb a little more elevation, but it is easy going the rest of the way.

From the top of Picacho Peak you have 360 degree views for as far as the eye can see. I was thankful to have clouds blocking the sun during our time on top, otherwise it would have been extremely hot and sunny exposed photos!

Enjoy a nice rest at the top, because climbing down isn’t easy as pie. You have a very steep section to go down, and the steep section to make it back up to the saddle!
When you are ready to tackle those just head back down the way you came.
If you crave difficult climbs check out Ultimate Guide to Hiking Flatiron via Siphon Draw Trail
Tips For Hiking Picacho Peak
- Avoid the hottest part of the day when hiking.
- If you are afraid of heights or don’t want to do the cables section, stop and turn around at the saddle.
- Don’t be fooled by the clouds if there are any- still use sun protection!
- Hydrate the night before and morning of.
- Wear tighter fitting clothing so it doesn’t snag when you’re climbing or scooting down rock.
- Bring gloves with good grip- the cables are slippery.
- If you forget gloves the park entrance should have some for sale between $3-$4!
- This mountain is beautiful during wildflower bloom!
Picacho Peak Hike Gear List
- Reliable hiking backpack
The Hunter Trail is steep and requires holding onto cables, so having a good hiking backpack to carry your supplies and keep your hands free is recommended.
- Water and snacks
The trail may be short, but it is highly suggested that you pack a minimum 2-3 liters per person for this hike. Using a hydration bladder makes it easier to sip water as you’re moving, plus it reduces the amount of water bottles you’ll need to bring along.
Climbing can bring on the appetite so don’t forget your salty and protein filled snacks. Rise Bars are my favorite protein bars to bring along on hikes!
- Hiking/climbing gloves
Gloves come in handy with the cables ensuring your hands are protected. Opt for a pair with good grip so the cables aren’t so slippery.
- Sturdy shoes with good grip
You’ll want great grip on your shoes when climbing. Having a quality hiking shoe like the Adidas Terrex makes a difference!
- Sun protection
You’ll be exposed for the majority of the hike. Having sunscreen, sunglasses, and/or a hat is important for your health and comfortability.

Final Thoughts On Hunter Trail To Picacho Peak
I must admit, I hadn’t hiked for a couple months before hopping on this trail to get back out there, so my legs were feeling like Jell-o by the end. The Hunter Trail was steep and challenging, yet thrilling and rewarding at the same time.
The views along the trail and at the top of Picacho Peak were worth all the effort. It should only take you a half a day or less to conquer this one, but if you want to extend your time you can check out the other small, scenic trails the park has to offer.
My husband and I had time to stop by the Casa Grande Ruins National Monument between the park and Phoenix. If you are coming from Phoenix I highly recommend taking the little detour to witness very well in-tact Native ruins!
As always, please be considerate of the environment so we can keep enjoying it and remember to leave no trace.
You may also like:
- 9 Amazing Superstition Mountains Hikes for your Bucket List
- Visit the Old West Town of Tortilla Flat, Arizona
- 5 of the best Sedona Caves and how to find them
- Hiking The FULL Bright Angel Trail To Phantom Ranch
- Conquering Browns Peak In The Four Peak Wilderness, Arizona
I’ve been thinking about hiking picacho, actually most times I drive by on the way to Phoenix I think, “I gotta!” My excuse is waiting for cooler months ahead! Great pictures, thanks for sharing.
Luckily cooler months are ahead! Hope you stop and check it out this winter, enjoy 🙂
Obsessed with reading all of your posts <3
Oh my goodness you’re too sweet, Danielle <3